Showing posts with label tau. Show all posts

Tuesday, December 24, 2013

Tournament: Dragon's Lair 12/15/13

I played in the 2013 Dragon's Lair tourney of champions last Sunday and faced off against the top 8 players from the 2013 monthly tournaments, minus one or two that could not attend. I played with one of my latest 2000-point Tau incarnations, though I wish I had come up with my current Farsight build (more on that later) beforehand, because I think I would have had even more fun. As it was, I came away with first place after three tough games. The 'Cuda is always a lot of fun, and does really well at short range. Here was my list:

Ethereal
Riptide - ion accelerator, twin-linked fusion cannon, early warning override
3 Crisis Suits - 6 flamers, 3 fusion guns
6 Stealth Suits - 2 fusion guns, Sha'vre with homing beacon
10 Fire Warriors
10 Fire Warriors
10 Fire Warriors
6 Fire Warriors
Devilfish with disruption pods, smart missile system
16 Kroot - sniper rounds
6 Pathfinders
6 Pathfinders
Barracuda Air Superiority Fighter
Hammerhead - Longstrike, submunition rounds, disruption pods
6 Sniper Drones - 2 controllers
3 Broadsides - 3 high-yield rocket pods, 3 smart missile systems, 6 missile drones

Game 1 - Grey Knights


Missions: Killpoints/Relic (1 pt each turn held plus 7 at end of game)
Deployment: Vanguard Strike

My first opponent was Matt, who I definitely respected as historically being the best Grey Knights player in the local community. He had tons of psycannons and plenty of boots on the ground: Inquisitor, Grandmaster, 6 or so Paladins, incinerator dreadknight, 2 psyfleman dreadnoughts, and a few rhinos. My crisis and stealth suits were fairly useless in this game, but everything else delivered a ton of fire into the grey knights line as they ran for the relic.


Matt ended up getting 10 points from the relic mission, plus a few bonus, and I ended up getting most of my 13 points from popping a ton of his combat-squaded units. The sniper drones were helpful in taking out the dreadknight, but it was the fire warriors long range along with the ethereal's pulse boost that generated most of the wounds I caused.

Game 2 - Sisters of Battle


Mission: Emperor's Will/Crusade (3 objectives)
Deployment: Dawn of War

For my second game I faced off  against our local Sisters player JR. He was running Saint Celestine, Urea (sic) Jacobus, a Canoness, an inquisitor, a bunch of seraphim, dominions with meltaguns in an multimelta immolator, several small sister squads in rhinos, a big sister mob squad that ran with Urea, heavy bolter retributors, and two exorcists. This is a tough army that puts out a ton of fire, especially the retributors and the exorcists. He had a perfect start, seizing the initiative and scouting the dominions straight at longstrike, taking him out before he had a chance to even tie his shoes. His blob squad came on hard and killed most the kroot and pathfinders, and plenty of fire warriors.


Still, there was still plenty of my stuff left so that when he got to mid-range for the mid-table objective, the torrent of tau fire wiped out one unit after another. I got max points and moved to the top table for my third game.

Game 3: Eldar
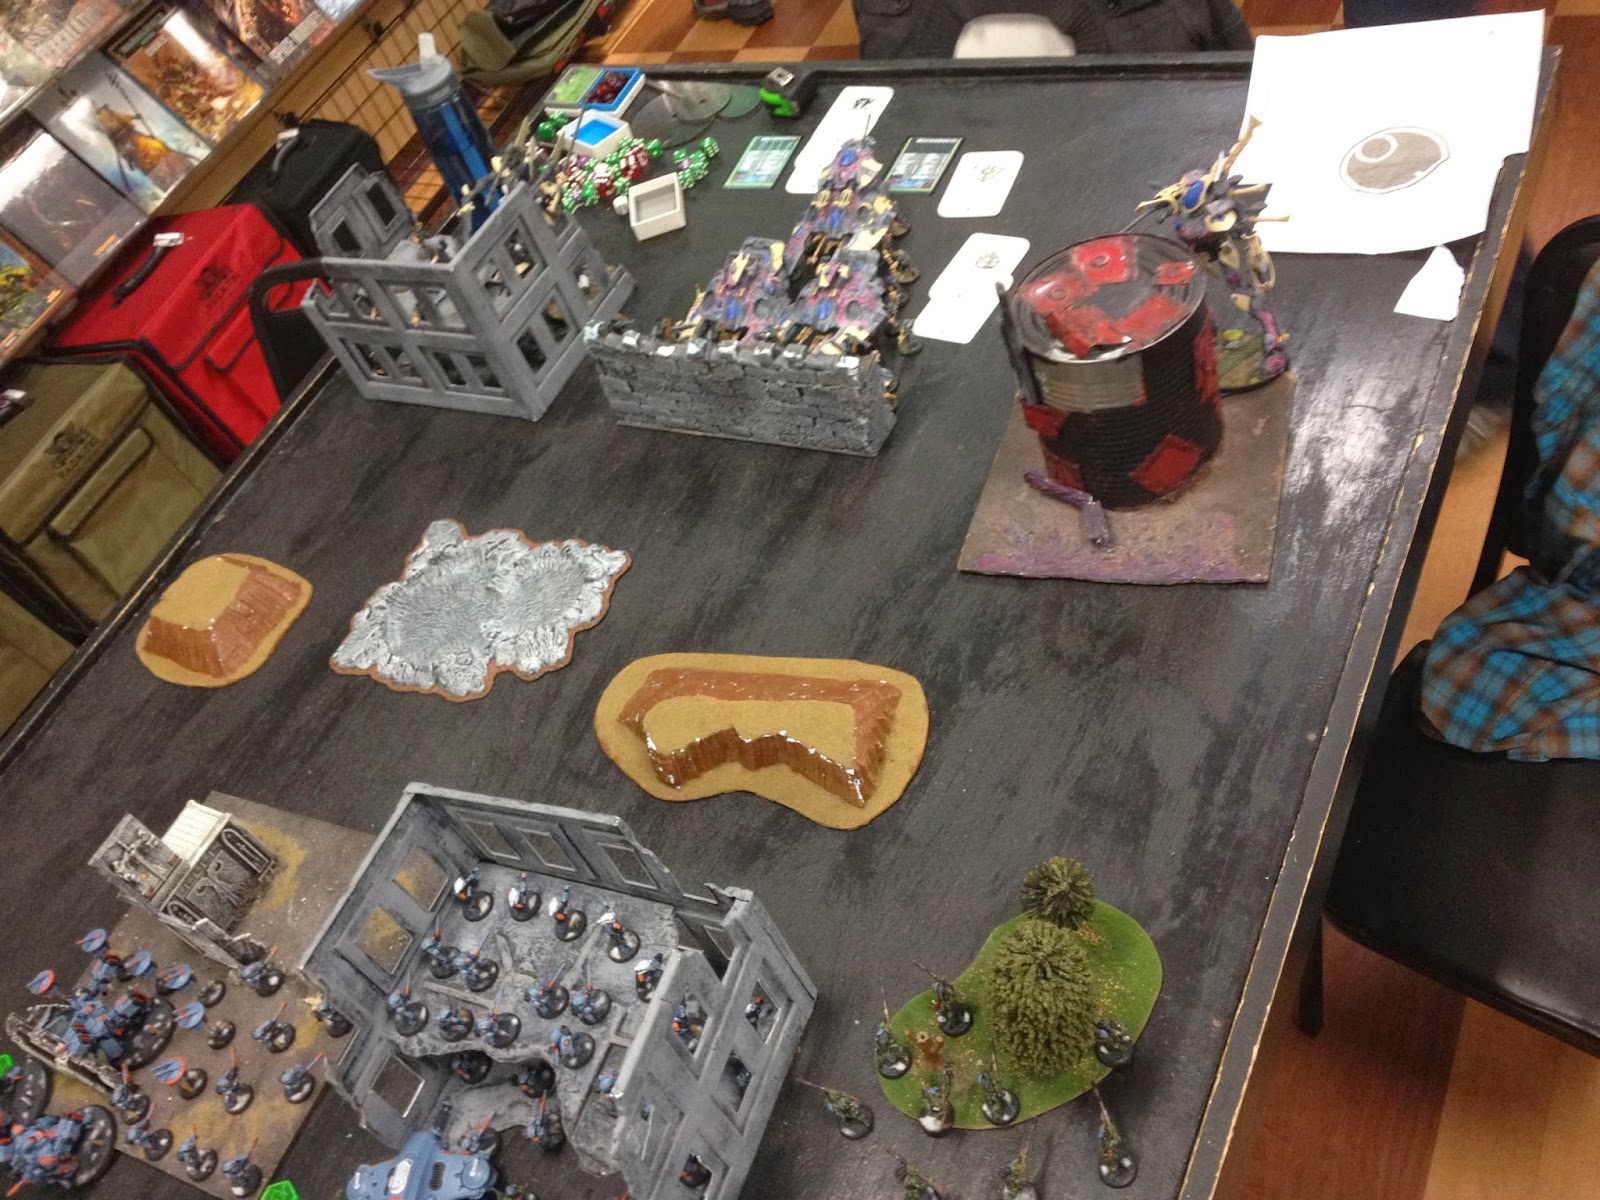


Mission: Big Guns Never Tire/Crusade (3 objectives each)
Deployment: Hammer and Anvil

For my last game I played against Brandon who was doing well with an Eldar build close to or possibly the same as Darkwynn Nick's list that he used to win Feast of Blades this year. 2 farseers, 2 big guardian squads with 2 bright lances each, 2 D-wraithknights (1 as warlord), a small squad of rangers, 2 windrider jetbike squads, 2 7-man warp spider squads, and a nightspinner. We both had 3 objectives spread evenly across our own deployment zones, but being the more mobile army, he crossed the table quickly to come at me. He had a really good start when his warlord knight D-cannon'd my Riptide right off the bat. He parked one guardian squad in a 2-story building on his right, and charged at me with the other led by a fortune farseer. I wiped out the rangers fairly easily on the middle wall piece with SMS. He charged one wraithknight up on my right flank, and I took him out pretty quickly with pulse fire, sniper rounds, and missile pods. Both wave serpents kept the heat on and took out my pathfinders early on. The other wraithknight eventually strode forward, and despite heavy losses I managed to drop him as well (thanks in big part to the Barracuda). I eventually wiped out his aggro guardian squad and farseer. The game came down to the last turn. He was holding his three objectives with his surviving guardians and small jetbike units, and on my last turn I flew the 'Cuda over and dropped one jetbike, causing a leadership test which he promptly failed and fled. I ended up beating him by one objective along with more heavy support units killed (the 2 knights).

What I really took away from this tournament was that stealth teams are neat in concept but really pretty pointless, and that crisis suits that scatter are also very hit or miss for the points. But instead of spamming things or running some kind of triple-tide or taudar abomination, I've decided putting points towards improving the existing units in my army that usually carry the day. After all, Longstrike has proven well worth the investment with his tank hunters and BS5 bonuses. I've decided to go Farsight and drop the stealth team, field O'Shovah himself, and thereby make the crisis suits scoring and scatter-free. I have to pay the bonding knife douchetax, but in trade I get to have all the above PLUS the earth caste pilot array, which is like Longstrike for ion riptides, and the hexadingdong deny-the-witch doodad, which I have not gotten to use yet. Oh and my troop units can regroup even in teeny squad sizes? I wouldn't kick that out of bed. I had to lose intercept on the riptide and split fire on the broadsides, but like the stealth team, those have only been marginally useful in the games I've played with them. More often than not I count on the full volley of the broadsides to really finish off the tough units coming right at me or plug away at enemy scoring units in cover. And I rarely want to use intercept with the ion accelerator in the enemy turn when I'd rather take away cover from targets using pathfinders before putting down his big badass pie plate. More to come!

Sunday, December 15, 2013

Video Battle Report - Tau vs. Space Marines


I played a 2k game against Marky Mark's Assault Rammin' Space Marines this week and made a new video battle report. When I made my latest 'big' list of Tau, I wanted to include some less popular units and also take advantage of the new Barracuda rules in the IA3 update. So I did away with the helper commander and second tank.

Here's my current list:
Ethereal
3 Crisis Suits - 2 flamers and fusion blaster each
Riptide - early warning override
6 Stealth Suits - 2 fusion guns, Shas'vre with homing beacon
10 Fire Warriors
10 Fire Warriors
10 Fire Warriors
6 Fire Warriors - Devilfish with disruption pods and SMS
6 Pathfinders
6 Pathfinders
Barracuda Air Superiority Fighter - disruption pods, decoy launchers
Hammerhead - Longstrike, submunition rounds, disruption pods
3 Broadsides - high-yield missile pods, SMS, 3 split fire, 12 missile drones
6 Sniper Drones - 2 controllers

 I've played with this list a few times now. The Barracuda does ok, and it's only got 2 hullpoints, but I think it looks and plays so much better than the codex flyers. Even with some of the more 'fun' units, this list has still done pretty well; well enough that I'm just not sure if it can even hang in the 'friendly' game circuit. I did put the finishing touches on it today, including lens effects and sept markings on everybody. I picked yellow for Tau'n since I think it popped pretty well with the orange already in the scheme. I had to experiment with a sept marking quite a few times before I got a simple, repeatable design, and I think it came out pretty well. Here's a few more pics from our game:


Bonus picture of current Project X!

Tuesday, October 22, 2013

Video Battle Report: Tau vs. Chaos Daemons 1850

I tried my hand at a video battle report! I've already got some ideas on how to improve and make it more interesting next time. Stay tuned.


Friday, June 14, 2013

WARGAMESCON 2013

Another year of WGC has come and gone, and I did about how I usually do. I went 3 and 1 the first day, and 2 and 1 the second. Tau are really fun and generally forgiving - up to a point. The biggest problem I had was achieving long distance objective missions; I was always able to turtle up and shoot the hell out of things, but sometimes my frontline troops would get eaten up, making moving forward and going after long distance objectives very difficult. Also, if you're having to deal with a bunch of big pieces of  LOS-blocking terrain in your way, especially like the shitty walled-on-3-sides 1'x1' buildings with no windows on the first floor that were all over the place at WGC, Tau can have a serious problem. Still, even when times looked most grim and my pretty blue fishmen were surrounded by enemy assaulters, supporting fire and storm of fire from the ethereal really whittle the bad guys down pretty quickly. I definitely learned a thing or two playing these games - I hadn't gotten nearly enough games in with them before hand to avoid making some key mistakes. But I liked all my opponents and gave em all great games. Nice meeting them all.
 

 Here was my list:

HQ   Ethereal (warlord)

HQ   Commander - drone controller, multispectrum sensor suite, command and control node, 2 rocket pods, puretide engram neurochip

EL   3 Crisis Suits - 2 flamers, 1 fusion gun each

EL   Riptide - ion accelerator, velocity tracker

TR   6 Fire Warriors - Devilfish with distortion pod

TR   3 x 10 Fire Warriors

TR   16 Kroot - sniper rounds

FA   8 Pathfinders

FA   8 Pathfinders

HS   Hammerhead - blacksun filter, distortion pod, submunition rounds, SMS

HS   Hammerhead - blacksun filter, distortion pod, submunition rounds, SMS

HS   3 Broadside Suits - 3 x target lock, high yield missile pods, SMS, 6 missile drones

The commander/broadside rocket unit really does the heavy lifting for this army. I love rolling all those rocket dice. It will bludgeon its way through just about everything save AV14. Maybe I should just be more agressive in moving forward with my shooty horde. I did learn that the drone controller does not work for missile drones, which was an oversight on my part as I just assumed a drone is a fucking drone, whatever could be the difference? But no, not all drones are created missile. The hammerheads ditch out punishment and are pretty hard to take down at range. And SMS are really the shiznit. More on that later.


Game 1: Chaos Daemons (CSM Allies)
Deployment: Dawn of War
Element 1: Crusade (5 objectives)
Element 2: The Relic

My first opponent, Ryan, had a nurgle-themed list with 2 great unclean ones, 3 beasts of nurgle, 4 plague drones, 2 x 10 plaguebearers, 2 soul grinders, a demon prince, 10 cultists, a helldrake, and an aegis with comms relay. I was able to take out 2 of his 3 scoring units and managed to repulse his more aggressive daemons before they did too much damage to my lines. My crisis suits scattered badly and so could not accomplish their mission of flaming his third troops unit before they got burnt up by the heldrake. I ended up with a modest win, 3 objectives to his 1, and neither of us got the relic.


Game 2: Chaos Daemons
Deployment: Vanguard Strike
Element 1: The Scouring
Element 2: Crusade

My second game was against Mark and a pure demon list including 2 khorne heralds leading 2 squads of 18 khorne hounds, 3 nurgle soulgrinders, a big squad of daemonettes, an aegis, and I think a couple more squads of plaguebearers. A lot of line-of-sight blocking terrain pressured me into deploying too close to him instead of far in my own corner where I might have bought a turn or two more of shooting. It didn't hurt that one of the big squads got a 3+ grimoire save for half of the game, and I spent every one of my turns dealing with the dogs.


There were only a few left in the second squad when they multi-charged the kroot and fire warrior squad along with the riptide (I screwed up and left him too close to the front line for no reason). Naturally they killed a handful of kroot and fire warriors, and my whole lot were run down. By the time they were dead, I didn't have much left to fight for any of the objectives. I think I scraped up 6 points or so to his 20 something. Those khorne dogs sure are mean!


Game 3: Grey Knights
Deployment: Dawn of War
Element 1: Purge the Alien
Element 2: Emperor's Will

My third game was against John and his Grey Knights. He had a grand master in terminator armor, two strike squads in storm ravens, an interceptor squad, and two dreadknights. With the psychic communion, he coordinated a second turn wave assault with his whole army. His turn of shooting killed a lot of my troops, but even I was surprised by the amount of death a few half-strength squads of fire warriors can put out. Here was my turn 3:


From behind the squad of kroot, I managed to wipe out his entire force minus a couple of strike squad knights, the two stormravens, and the grand master; for some reason he kept him alone standing on the hill in the back, and I picked him off with a hammerhead shot. The stormravens died as soon as they started hovering; one I brought down with rocket salvos, and the other got smashed by the riptide. After that, the riptide jumped over to his side and finished off the last strike knight. I got full points. John was a good sport and a nice guy.


Game 4: Chaos Space Marines (Chaos Daemon Allies)
Deployment: Hammer and Anvil
Element 1: Big Guns Never Tire (4 objective markers)
Element 2: Scouring

Unfortunately I don't remember my last opponent's name. He had a nurgle-themed army led by Typhus, 4 or 5 plague zombie squads, a small squad of plague marines, 2 baleflamer helldrakes, 3 full-las predators, a nurgle herald (I think), a squad of plague bearers, and 2 squads of blight drones (total of 3 drones). In the first few turns, I was able to take out all his troops save for 2 plague zombie units close to his long edge sitting on an objective. He deep struck Typhus solo behind my lines, but didn't get much done before I shot him down. I lost the riptide eventually, and took some casualties in my broadside unit, but I got full points on this one going into the second day. Predators are not easy for hammerheads, and it took most of the game to bring them down.


Game 5: Imperial Guard/Space Wolves
Deployment: Hammer and Anvil
Element 1: Big Guns Never Tire
Element 2: Purge the Alien

My assigned opponent was too hung over to show up on time (damn you Daniel!), and I got paired against american bad ass Paul Murphy and his imperial guard/space wolf army, featuring 3 spartan lascannon batteries, a thudd gun battery, a lord commissar leading a blob squad with a few autocannon teams, 2 manticores, a squad of veterans in a vendetta, logan grimnar, a rune priest, and 6 or 7 thunderhammer/storm shield wolf guard terminators. He really only needed the manticores and thudd guns to knock the hell out of almost everything I had in the middle, because by no means would I be able to make any moves into his deployment zone anyway. I wiped out logan and all his wolf buddies, and immobilized one of the manticores (greaaaaat), but I lost my entire center line along with the ethereal. He tried to make a late game grab for my third objective with veterans coming out of a vendetta, but I was able to take them out with fire from the kroot and the few smart missile systems I had left. The game ended on turn 5 just as I might have captured a third objective with my hammerhead (would have had to weather a storm of lascannons, mind you). He won by kill points and we drew on objectives 2-2.


Game 6: Tau
Deployment: Vanguard Strike
Element 1: Relic
Element 2: The Emperor's Will

Ahh the relic. A weakness for me - since 6th came out, I have not wrapped my head around how to best go after the objective in Relic missions, and that definitely extends to Tau. I've won it before but definitely not consistently. I think my second opponent on Day 2 was named Gary? In any case, he had a triple-tide tau army, led by an ethereal and commander, 15 or so kroot, a squad of fire warriors on foot, 2 devilfish (1 with fire warriors, 1 with pathfinders inside),  3 total squads of 4-5 pathfinders, 2 broadsides (1 with railgun, 1 with high yields), and a sky ray.


I got first turn and moved up, wiping out both of his non-embarked pathfinder squads, one of the fire warrior squads, and all but 2 of the kroot with my missiles and sniper fire. Making the rocket squad twin-linked and ignore cover is sweet like strawberry. I used 'monster hunter' on them to take out one of the riptides, grounded both of his devilfish and sky ray with 'tank hunters,' and let them kill the broadsides the old fashioned way. I grabbed the relic once or twice, but both times my grabbers died and neither of us held it at the end of the game; we both held our own home objectives. It was a draw, though I won first blood, slay the warlord, and the extra point for the ethereal.


My last game was against Brian and his sassy riders of slaanesh: 4 heralds (2 with mounts, 2 without), 2 squads of 3 fiends, 3 squads of about 16 daemonettes, 2 squads of 13 seekers (which were led by the 2 mounted heralds), and 2 nurgle soulgrinders. I had flashbacks after setup to the game against the khorne dogs, and I was feeling the pressure.


Fortunately slaanesh cav and beasts are badass in combat, but they're much more easy to shoot down. I ended up all but tabling him after his highly diminished charges crashed into my lines to little or no effect. The smart missiles found their way into the cracks and crevices to wipe out the unit of daemonettes holed up inside the 3-walled building in the middle. Love those guns!

All in all a good year, something like 4-2-1. Not sure where I ended up but it was probably somewhere just above the middle of the pack. Tau are pretty fun once you get that the real trick is to both turtle up well AND shift out of turtle mode effectively at the right moment. I'm still getting the hang of them for sure. I might be messing with Eldar for some time, but next time I take Tau out for a spin, I will more than likely include a second devilfish (and give both smart missile systems).

Wednesday, May 29, 2013

I Tau Myself

Workin' on the tau but thinkin' about Eldar! 

Here's my current list:

HQ Ethereal (warlord) - homing beacon
HQ Commander - drone controller, puretide engram chip, multispectrum sensor
EL 3 Crisis Battlesuits - 2 flamers and 1 fusion gun each
EL Riptide - ion accelerator, intercept, stim injector
TR 10 Fire Warriors - Devilfish with disruption pods
TR 10 Fire Warriors
TR 10 Fire Warriors
TR 10 Fire Warriors
TR 16 Kroot - sniper rounds
FA 6 Pathfinders
FA 6 Pathfinders
HS 3 Broadsides - target lock, 6 rocket drones
HS Hammerhead - Longstrike, submunition rounds, SMS, disruption pod
HS Sky Ray - disruption pods

The Commander hangs with the broadsides (giving them BS5 missile drones, ignore cover, and helpful USRs), who castle up along with the Etherealfish and Riptide behind Fire Warriors. The Kroot harass. Once major threats are dealt with I expand the sphere, so to speak. Hope to play my first game with them tomorrow and see 'wut it do.' I may drop Longstrike for 4 more Pathfinders and a blacksun filter for the Hammerhead, and maybe swap the Riptide's stim injector for skyfire and take a second Hammerhead instead of the Sky Ray.

Here's a prototype Fire Warrior:


The plan is to add patches of snow and hay-colored dead grass bunches. That will take a while!

And my Riptide, rippin up what will eventually be a Crimson Fist or Ultramarines Ven Dread:


Monday, April 22, 2013

The Swollen Third Sphere Game 2


I played another 1850 game with my Tau on Sunday against Hart’s Chaos Space marines/Chaos Daemons hybrid list. It was an Emperor’s Will/Vanguard Strike game. I had little problem shooting the everliving hell out of his army, but it came down to his Nurgle Lord with one wound sliding into home to contest my home objective at the last second, and the game ended on Turn 5, so he took it 4-1 (I got first blood). Some further notes on Tau after this game:

I love gun drones. They seriously put out a ton of shots together with the Ethereal Storm of Fire bubble, and are also handy to have in the same area as your fire warriors for providing supporting fire. BS2 is no big deal when the guns are twin-linked and S5. Plus they can move out, pour shots into enemies, and pull back to serve as assault screens. Since any of the heavy tanks and the devilfish already have one gun, taking SMS instead means one gun would usually be snap-fired (unless you’ve got great cover). I’d rather have the cute little drones to fly around and be annoying, especially since they don’t give up kill points.

Since the Sky Ray is my only unit (currently) with skyfire, and I’ve only played against Chaos armies with dragons so far, it can be a little bit challenging to bring down dragons the first time they show up on the table. But for the second time, at some point the dragon flew over my fire warrior nest, and with help from the Sky Ray markerlights, enough S5 infantry survived to snap fire into the rear armor 10 and wounded or destroyed it. It’s always a tough call on how many Sky Ray seeker missiles to commit to a particular target. I have been throwing 3-4 at a time up at the dragons, and it has not been enough to do the job. It just seems like a waste to go ahead and launch all 6 at once, leaving the Sky Ray to just be a roving double markerlight vehicle (if it doesn’t move). I eagerly anticipate fighting other races’ fliers to see if I can do any better against AV 10 or 11. Flying monstrous creatures have so far not been a problem given the amount of pulse rounds I can put out at close range.

Disruption pods, still worth it. I made plenty of cover saves this game because of them.

I’m iffy on my TL-flamer/burst cannon crisis team, since they are sort of a delicate one-trick pony, but they only cost 126 points, so it’s not like I’d get much by cashing them back in. Plus they give me a deep-strike unit that I can either take to the backfield for contesting and/or the Linebreaker point, or use my Ethereal’s a homing beacons on my gunline for some accurate anti-swarm flames.

Still waiting on my Broadsides to come in… don’t think GW has even shipped them to the states yet. Bah. Playing with a second hammerhead and the stealth suits (especially their homing beacon) is still fun for now.

The Tau firebase is very difficult to get close to and not get the hell blasted out of you. If they don’t make the charge in one fell swoop, they are probably within range of an Ethereal Storm of Fire barrage during the Tau turn, they must then survive all the supporting fire overwatch, which is also enhanced by Storm of Fire. Things that can charge from great distances, such as Maulerfiends or beasts, are high priority targets. But even if an enemy does make it through gun drone screens to a fire warrior squad, the fire warriors will either be wiped out or break, and the assaulters will probably not survive a second turn to take anything else out. It looks like the key to assaulting Tau is either getting them to spread out somehow, or whittling down the firebase with your own shooting before jumping in for up-close carnage. Obviously, heldrakes can be a big problem to keeping up your gunline resilience. I’m trying to get better at model placement to control Heldrake movement over and around my firebase. Again, if you can make them fly past you and get your pulse rifles in the rear armor, bringing them down becomes a much more reasonable proposition.

Having 3d6 jet pack moves with my Shadowsun/low-AP crisis suits is cra-mazing. Given their awesome range, as long as you are within 12 inches, you are putting in 6 S6 AP2 shots and 5 S8 Ap1 shots, re-rolling ones, and then bouncing away up to 18 inches. I wish I could afford to put another few drones with that unit to soak up wounds from things like the baleflamer or krak missiles, but I’m not sure how to get the points. I did give the fusion/plas suits advanced targeting systems this time, but it didn’t do much for this particular game (Hart made great look-out-sir rolls and cover saves for his Nurgle Lord and accompanying plague marine unit).

Thursday, April 18, 2013

The Swollen Third Sphere Game 1

Some pics of my Crisis Suits - now with extra dynamism (that's a thing):


Got in my first game with the new Tau tonight against a Chaos Space Marines list. We played 1850 Big Guns Never Tire with 4 objectives and Vanguard Strike Deployment. He had a nurgle bike lord with some nurgle bikes, 2 x 35 and 2 x 12 man squads of cultists, 1 small squad of plague marines with plasma guns, a tentacle-love maulerfiend, 2 heldrakes (1 baleflamer, 1 hades), and 2 lascannon predators. I had an ethereal, shadowsun with command drone, 3 crisis suits with TL flamers and burst cannons, 4 stealth suits with a homing beacon shas'vre, 3 crisis suits with fusion guns and plasma rifles, 2 x 6 pathfinders, 2 x 6 fire warriors with devilfish, 2 x 12 fire warriors on foot, 18 kroot with sniper rounds, 2 hammerheads, and a sky ray.

It was a fun game, bloody on both sides. I had a great start, and was looking to do some real damage with shadowsun on his left flank deep striking off infiltrated stealth suits, but they were not able to drop a maulerfiend, and then I stupidly left them bunched and ready for his heldrake coming on the table. Some failed look-out-sirs, then some failed leadership tests = adios both units. I was only able to cripple the big birds (really felt the absence of my broadsides). My kroot, fire warriors, and 5 squads of free-roaming gun drones were able to inflict enough damage to his midfield objective holders that I kept him from grabbing an objective in the center. Meanwhile my flamer crisis squad deep struck perfectly next to a small cultist squad holding his backfield objective and wiped them out handily (only 12, but they could have killed at least 18 - I like that unit so far). Meanwhile I captured my home objectives with a sky ray and hammerhead. He got first blood and slay the warlord, and had killed 1 of my hammerheads, but I had 2 objectives along with the maulerfiend kill, and so earned the win. It was tough gong for a while tho.

What did I learn?

* I had a blast markerlighting stuff and making the fire warriors completely wreck face on his infantry. I could have done more with them but all my markers were obsessed with heldrake defense after Turn 2. I was looking forward to doing some stick and move with sky shadow, but he wisely shut that down with the flamey bird while the other one flew about vector striking my vehicles.

* Pathfinders plus fire warriors plus the ethereal's power to grant an extra shot at half range = big time. And 2 squads of 6 PF seemed about right for markerlights, and obviously the sky ray using skyfire for his networked lights was nice too.

* The sky ray was ok. My seekers didn't do much for me in this game, but the 2 sky fire markerlights at least gave me a chance to fend off one of the heldrakes.

* Why did I take bonding knife ritual for crisis suit teams - with a 3 man team, you would never be below 25% squad size, so who cares about heroic morale, and with shadowsun joined up, she'd ideally die last and have heroic morale anyway. So there's 6 points I could have spent somewhere else.

* The build I'm going for eventually (once GW gets their shit together and ships their gd awesome product) will include broadsides instead of the stealth suits and the second hammerhead - but I will miss those units in my 1850 list. Two hammerheads was way more forgiving than one (although mine could still not bring down 1 stupid maulerfiend). The stealth suits provided a little dakka, the homing beacon was clutch, and I love the models, but I think I would only bring them out for 2000 points or more.

* Are distortion pods worth it? Oh you betcha. 

* Still learning how to castle well against heldrakes, damn their scaly hides. I had to stretch out a bit to inflict good damage to his midfield, so it was easy for them to bounce around hectoring and vectoring. I definitely could have used more skyfire to at least give me a chance to kill ONE of the gd things. At least they didn't both have a baleflamer.

* Fire warriors and pathfinders need area terrain early in the game. Otherwise, even with their superior anti-personnel dakka range, they will get picked apart.

* I may have to add interceptor to my broadsides... so expensive though! (Arrggh I want my models!)


Tuesday, April 9, 2013

Third sphere? Might wanna have that checked out.

So here's my first go at a seemingly decent, mixed-bag tau 1850 list. No new toys besides the high yielders, but it's all new to me, so, yay me.

Shadowsun - command drone

Ethereal - blacksun filter, homing beacon

3 Crisis Suits - plasma rifles + fusion guns, 1 with vectored retrothrusters

3 Crisis Suits - twin-linked flamers + burst cannons, bonding knife ritual

10 Fire Warriors - Devilfish with twin-linked smart missile systems

10 Fire Warriors - Devilfish with twin-linked smart missile systems

10 Fire Warriors

10 Fire Warriors

20 Kroot - shaper, sniper rifle rounds

10 Pathfinders - Shas'ui

2 Sky Rays - twin-linked smart missile systems

3 Broadsides - high yield missile pods, 6 missile drones, bonding knife ritual

The ethereal hangs out with the broadsides to let them ignore night-fighting if needed, or hides in one of the devilfish and just extends his aura from a central location. Shadowsun rolls with the plasma/fusion suits, gives them infiltrate, stealth, shrouding, and 3d6 jump pack moves, plus granting a unit within 12" (such as themselves) re-rolling ones to hit in shooting. They give her hit and run. They can either infiltrate for an early strike and retreat, or deep strike near the ethereal (or elsewhere) as needed. Flamer/burst crisis suits also deepstrike or counter-attack as needed. Pathfinders and sky rays mark the hell out of everything on the ground or in the air, the kroot hide in cover throwing out sniper rounds at marked units, and the fire warriors and broadsides shoot anything that moves (especially if its marked), staying together to provide supporting fire. The devilfish I imagine hanging around screening/directing assaults, hanging around for late game maneuvers (if they last that long). I tried to only give bonding knives to the units that would have any real use hanging around to the last man. For 2000 I can throw in 5 stealth suits for some dakka from cover. I have about 80% of these models, so not a real stretch of the imagination, or the wallet.

Can I recommend the Forge the Narrative Podcast BOLS has got going on now? I think I can, BOLS took me off their blogroll years ago so there's no real conflict of interest anymore. It's pretty "legit," as they are so fond of saying. Finally some guys who know what they are talking about... hardcore competitive guys that manage to sound condescending only 30% of the time, and even then it's utterly without all that false humility, so you know they really mean it. But seriously, only 3 episodes in and I have enjoyed it far more than any other 40k podcast out there - no inside jokes, grabass, or gigglings that go on and on, just straight talk from some dudes that play a lot of games and have been to a lot of big tournaments, but more importantly, have all played this game for a long time.

Friday, March 8, 2013

Next project... hmmm

 (image by Raax)
After selling my catachans to some lucky club in Florida, I am trying to decide what project to take on next. Over the past couple months, I have worked up an Imperial Fists lists that could use either  the Horus Heresy book or the Space Marine book. Very expensive models but a cool effect and there's plenty of other Heresy players in town.

However, the upcoming Tau release is like a splinter in my brain... I love playing xenos and Tau could be a fresh new game to play for me after playing almost exclusively Necrons over the past year. I also think in terms of my collection, a Tau army could be different than my other armies, both in terms of gameplay (long range shooting, barebones skirmish, finesse synergy) and in the overall aesthetic. I think it would be fun to incorporate a modern camo scheme to them, maybe do the 'snow based' army I have wanted to try for so long.

In the short term, I am planning on selling the Abaddon/Black Legion elements of my chaos army and focusing on the Khorne stuff. I had a few encounters with maulerfiends this weekend that gave me some hope for a crush-rush, and I WANT to play the new chaos book, but the Abaddon/rainbow chosen army just doesn't hit very hard. So going to consolidate.

I played a game with the khorne guys as blood angels last night which should appear as a video battle report on BOLS sometime soon, I'll post a link as soon as it does.

Monday, May 14, 2007

Battle Report: Imperial Guard vs. Tau 5-12-07

Bully vs. Marcos - 1500 points - Cleanse


Turn 1


Tau: The stealth suits, having infiltrated so close to the guard flank, open fire on the lascannon teams, killing four of them. The hammerheads tear up one of the infantry squads, sending it running off the table.

Imperial Guard: The demolisher moves left and fires on the stealthsuits, hitting four but killing only two of them. The sentinels and lascannon team shoot up one of the piranhas, shaking it. The ion cannon hammerhead is stunned by mass missile fire. The heavy bolter teams move into the tower.


Turn 2


Tau: The hammerheads zip into their adjacent quarter and fire their weapons, destroying the leman russ and killing two guardsmen in the far right squad. The devilfish kills one of the guardsmen in the tower. The intact piranha flies over the walls and tries to bring down the demolisher with its fusion blaster, but -alas- misses the crucial shot.

Imperial Guard: The basilisk goes fires indirectly at the battle suits but the shot scatters and hits the devilfish, shaking it. The heavy bolter teams destroy the piranha's weapon, and the lascannon team finishes it off. One sentinel moves to attack the approaching stealthsuits but misses, and the other fires across the battlefield, stunning one of the hammerheads. The first squad to target the ion cannon hammerhead brings it down with a missile. Additional rocket and plasma fire kills one battlesuit and inflicts a wound on a second.


Turn 3


Tau: The unshaken hammerhead shakes the basilisk. A devilfish darts around the chapel and its passengers disembark. The battlesuits and the fire warriors' pulse rifles bring down 4 guardsmen. The shas'el jumps out of cover and kills two of the guardsmen in the heavy bolter squad. The stealthsuits attack the threatening sentinel and it explodes, but they and the nearby lascannon team are unharmed. The remaining piranha circles further around the imperial guard flank.

Imperial Guard: The demolisher turns and fires on the squad of fire warriors, killing four of them and destroying the devilfish's smart missile system. The nearby guardsmen wipe out the rest with plasma and lasgun fire. The surviving lascannon team kills two stealthsuits with lasgun and lascannon fire and the hellhound finishes off the last two. The shaken basilisk zooms forward to move into cover.


Turn 4


Tau: One of the devilfish moves over and kills two guardsmen with its last weapon. The other devilfish immobilizes the sentinel. The hammerheads kill one guardsman and destroy the hellhound's flame turret. The last piranha's gun drones detach and move towards the guard position.

Imperial Guard: The stars align for the emperor's dogmen and they make some important shots: the basilisk fires indirectly at a hammerhead and destroys it on a glancing hit. The intact sentinel rolls to immobilize the other hammerhead, and when its decoy launchers attempt to change the damage result, the reroll is a 6 and it goes down for good. The demolisher hauls ass to stay away from the piranha's fusion death. One of the infantry squads runs into the cratered section of road to grab some cover. The hellhound stuns the devilfish.


Turn 5


Tau: The battlesuits jump from cover and kill one of the guardsmen in the far right squad, breaking them and sending them off the table.

Imperial Guard: Guard missile launchers blow up the stunned devilfish, and the lascannon team and hellhound finishes off the gun drones. The basilisk backs up to get in position for one last indirect shot on the battlesuits.


Turn 6


Tau: The last devilfish kills one guardsman.

Imperial Guard: The basilisk fires off the last guard shot of the game, hitting the battlesuits but failing to wound either of them. The hellhound and infantry squad move to contest both adjacent quarters (the infantry squad was straddling the line and rolled to occupy the crucial quarter).

Imperial Guard wins, solid victory.

Sunday, May 13, 2007

Battle Report: Chaos vs. Tau 5-11-07

C. vs. Marcos - 1500 points - Chaos Choice (Seek and Destroy)

(missed the setup picture)

Turn 1


Chaos: Chaos starts off well, rolling to choose the mission type and get first turn. Pressing the advantage, their big guns take down several enemy skimmers: the terminators blow up one of the piranhas with their reaper autocannons, the obliterators stun the devilfish and destroy its missile system, and the havocs stun one of the hammerheads. The berzerkers press forward in their rhino, followed closely by the flying possessed.

Tau: Shrugging off their early setbacks, the Tau regroup and counterattack. The crisis suits jump from cover and take out the rhino with plasma and rocket fire, killing four of its passengers in the process. The last two berzerkers are entangled in the wreckage. One of the hammerheads lays fire into the havocs in the bunker, killing two and sending the rest falling back.


Turn 2


Chaos: The havocs regroup, readying their weapons. The obliterators move out from cover and finish off the stunned hammerhead. The possessed fly out from behind the rhino and try to take down the piranha in midair but fail to inflict any damage.

Tau: The piranha flies away from the possessed and try to shoot up the entangled berzerkers, missing them. Its gun drones detach to create additional targets. The battlesuits and ion cannon hammerhead shoot up the possessed, killing all but the aspiring champion. A very close call for chaos - both of the summoning units for the bloodletters were nearly wiped out this turn.


Turn 3


Chaos: The possessed champion flies over the rhino and smashes up the gun drones. The berzerkers extract themselves from the rhino wreck and leap to catch the piranha. The chaos heavy weapons stun up the center devilfish.

Tau: The hammerhead finishes off the berzerkers with its ion cannon. The other hammerhead and devilfish circle around the chaos position, and the stealth suits streak forward with their jump packs.


Turn 4


Chaos: The bloodletters arrive from the warp, just in time to save the possessed champion and finish off the circling piranha. The terminators fire their reapers at the stunned devilfish and bring it down, killing four of its fire warrior passengers in the process.

Tau: The Tau Shas'el and the ion cannon hammerhead move forward and kills two bloodletters, and the other hammerhead and devilfish circle further around the left chaos flank.


Turn 5


Chaos: The terminators kill one of the approaching stealthsuits, and the obliterators destroy the remaining railgun hammerhead.

Tau: The battlesuits and and stealthsuits move to the center and the devilfish moves closer to the chaos position. Suddenly, something large stirs behind the trees!


Turn 6


Chaos: The demon prince flies over the treeline and drops in on the devilfish, but is simply unable to destroy the swiftly moving transport.

Tau: The firewarriors in the devilfish deploy in front of the demon prince and open fire with their pulse rifles. After the smoke clears, the chaos HQ is still standing, unharmed.

The match ends in a draw.